从零搭建个人博客系统
背景
使用个人博客也有多年的时间,比如博客园。 博客对个人学习好处很多,能记录所思所感,便于技术积累。一直想折腾一个自己的博客,前后也试过几个都不理想。直到发现现在这个模式:域名+github托管代码,现在把从零开始搭建个人博客的经验分享在这里。
分享地址:https://yutao.org/
搭建概览
- 申请免费域名
- 使用Hugo博客框架
- 博客部署到Github Pages
具体操作
申请免费域名
- 打开该网站https://register.us.kg/,并注册用户,注册名称既域名。
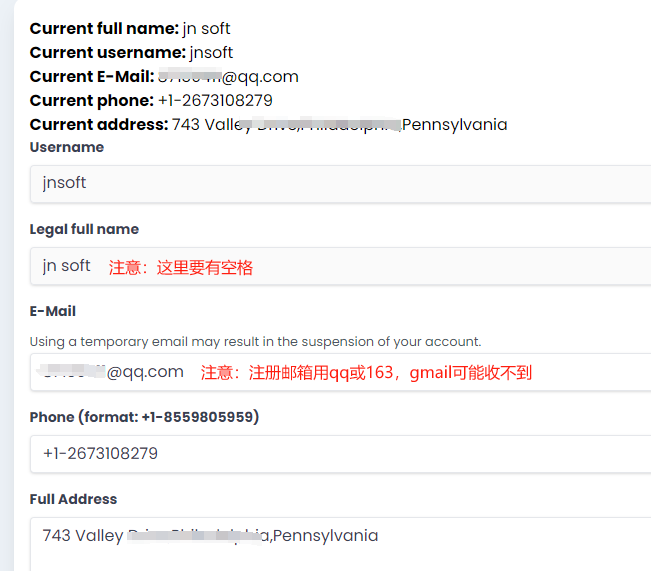
- 注册时提示输入美国身份信息,这里可以使用https://www.shenfendaquan.com/。
参考截图:

- 打开该网站https://cloudflare.com/,并注册用户,然后点击左侧网站按钮,添加站点,将刚刚申请的域名添加,选择免费。
- 拷贝cloudflare分配的2个名称服务器地址,回填到https://register.us.kg/,NameServer1和NameServer2。
使用Hugo博客框架
-
Hugo,也就是静态网站生成框架,构建了一套代码生成框架和各种可选的主题。通过hugo框架将Markdown语法编译成HTML文件。
-
Windows安装包管理器有choco、scoop、winget,这我使用choco。安装了该软件就等于安装了软件市场。
-
安装Go软件包,打开CMD命令窗口,执行:
choco install go。安装完成后执行:refreshenv刷新环境变量。然后查看go版本,执行:go version。 -
安装git,进入cmd命令窗口,执行:
choco install git。 -
安装hugo,进入cmd命令窗口,执行:
choco install hugo-extended。 -
通过cmd窗口进入指定目录,创建站点命令:
hugo new site jnsoft。 -
cmd切换到jnsoft目录,安装主题,我使用Jane主题,
git clone https://github.com/xianmin/hugo-theme-jane.git --depth=1 themes/jane。 -
进入jntech\themes\jane\exampleSite,复制config.toml文件内容,黏贴到根目录hugo.toml内。并将如下内容修改为自己的。
 1
 2
 3
 4
 5
 6
 7
 8
 9
10
11
12
13
14
15
16
17
18
19
20
21
22
23
24
25
26
27
28
29
30
31
32
33
34
35
36
37
baseURL = "http://localhost:1313/" # 博客部署网址 title = "江南小哥" # 网站名称 enableRobotsTXT = true # 是否支持Robots协议 enableEmoji = true # 是否支持Emoji表情符号 theme = "jane" # 选用jane主题 defaultContentLanguage = "zh-cn" # Default language to use [languages.zh-cn] languageCode = "zh-cn" [[menu.main]] # 配置菜单 name = "主页" weight = 10 identifier = "home" pageref = "/" [[menu.main]] name = "归档" weight = 20 identifier = "archives" pageref = "/post/" [[menu.main]] name = "分类" weight = 30 identifier = "categories" pageref = "/categories/" [[menu.main]] name = "标签" weight = 40 identifier = "tags" pageref = "/tags/" [[menu.main]] name = "关于" weight = 50 identifier = "about" pageref = "/about/" logoTitle = "江南小哥" # default: the title value # 默认值: 上面设置的title值 keywords = ["金融","编程", "科技"] # 关键字,应该是与搜索引擎搜索有关,博客内无展示 description = "江南科技" # 网页描述 -
通过cmd切换到jnsoft目录,执行:
hugo server。 -
打开浏览器http://localhost:1313/即可访问本地博客。
-
创建第一篇博客,jnsoft目录下,新增文件:
hugo new post/从零搭建个人博客系统.md。
博客部署到Github Pages
- 你要部署在GitHub Pages上,首先在GitHub上创建一个Repository,命名为:
{your_username}.github.io。比如我的Repo就叫yutaodev.github.io,并在Pages页面设置好刚申请的域名绑定。 - 现在我们有了Hugo个人站点,有了Github Pages,那么下一步就是把hugo博客发布到Github。这样我们才能在互联网的任何地方访问我们的博客。在我们本地的hugo根目录中执行:
hugo指令。会生成一个public文件夹,我们只需要把public的文件内容上传到github上刚才创建的Github仓库里面, 一分钟左右,就能正常查看博客内容。
总结
本博客最大优点,不花一分钱,完全免费,也不用关心博客运维,而且只要Github在你的博客就在,你就集中精力写博客就行。